
Before you get started uploading your artwork, there are some important things you need to know to get the best results when printing.
1. Set Artwork to Exact Size
We print to the exact size of the file uploaded. Set your artboard dimensions to the size of one of our sheets and arrange your artwork at the exact printing size within the area. If you are printing a gang sheet, you must submit your artwork set up as a ganged art file.
Gang sheet Options
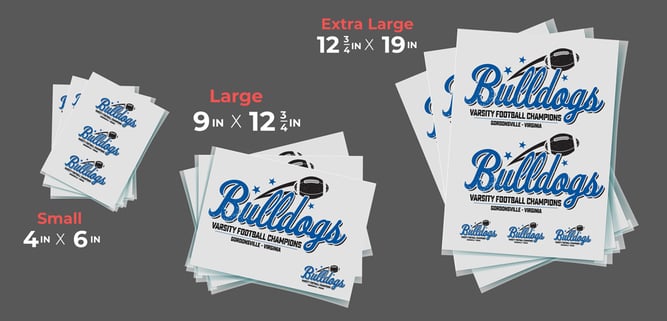
Single Image Options

2. Convert Live Fonts
Corel Draw
In Corel, you must first convert your text to a curve object.
- Using the Pick Tool, select the Text.
- Go to Arrange > Convert to Curves.
Or, just right click on the text while it is selected and choose Convert to Curves.
Adobe Illustrator
Illustrator allows you to convert your live fonts to outlines. To convert text to outlines, do the following:
- Select the type object you are trying to convert.
- Choose Type > Create Outlines.
Full Adobe Illustrator Help Article
Adobe Photoshop
In Photoshop, you must rasterize the type layer. Before you rasterize a vector layer, always duplicate it by choosing:
- Layer > Duplicate. Then, rasterize the copy.
- Choose Type > Rasterize Type Layer.
Full Adobe Photoshop Help Article
3. Check Fine Details
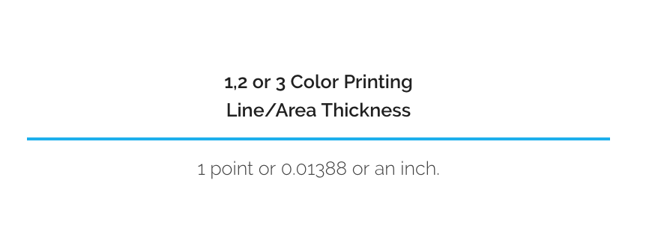
Line Thickness 1, 2 or 3 Color Printing:
- 1, 2 & 3 Color - Line/area thickness 1 pt. or 0.01388 of an inch
- Performance - Line/area thickness 2 pt. or 0..02776 of an inch
These print areas are designated with a BLUE line. The thickness of the line represents the minimum print tolerance.
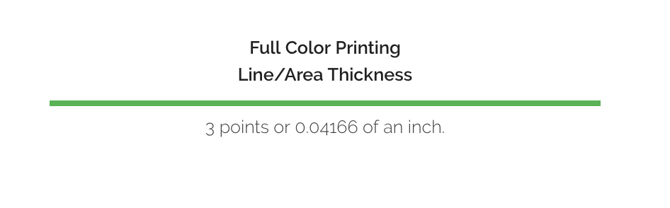
Line Thickness Full Color Printing:
- Full Color on whites & 100% Black Lines - Line/area thickness .25pt or .0035 of an inch
- Full Color to be opaque on all colored garments - Line/area thickness 3 pt. or 0.04166 of an inch
- Colored Outlines - Line/area thickness 2 pt. or 0..02776 of an inch
- White & Black Outlines - Line/area thickness 1 pt. or 0.01388 of an inch
- Stand-alone white - 1 pt. or 0.01388 of an inch (positive space) & 2 pt. or 0..02776 of an inch (negative space)
These print areas are designated with a GREEN line. The thickness of the line represents the minimum print tolerance.
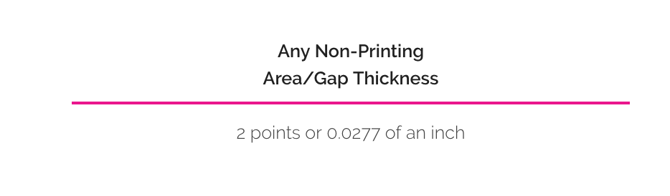
Line Thickness Non-Printing Areas:
- Non-Printing - Area/Gap 2 pt. or 0.02776 of an inch
- These "negative space" areas are designated with a PINK line. The thickness of the line represents the minimum print tolerance to ensure any areas or gaps in the image do not bleed together.
4. Use The Proper Filetype
We prefer .AI, .PSD or .PDF. We also can work with .SVG, .JPEG, .PNG & .EPS files. A transparent background is required for the best results, although if it's high quality our team can usually remove the background of the artwork without too many difficulties. Make sure your full-color designs are in CMYK format.
Vectorized artwork is best. If your artwork is Rasterized, please ensure the artwork is set at 300DPI. This is critical to ensuring your artwork does not print pixelated.